Wednesday, May 11, 2022

                 Custard Pudding... Practically No Sugar Added Version

 I followed the directions from this video 

But I changed the recipe to practically no sugar added because I'm type 2 diabetic.  My recipe makes 4 servings like shown in the video.  I don't make the caramel sauce because... sugar!!  If you want the caramel then use a Werther's Original Sugar Free Chewy Caramel.  When I do this, I cut one caramel into 4 pieces.  Flatten the caramel pieces with your fingers before putting them into the dishes.  You could use a whole caramel or half caramel per dish if you want.

Most days this is part of my breakfast.  I add a banana, a piece of toast, and a glass of whole milk.  If I remember correctly, the fat in the whole milk helps counteract (?) the sugars in the milk.

Here are the ramekins I use, the Stevia Powder I use, and the caramels I (rarely) use.


Now for the ingredients:

260 g. milk (I use either 2% or whole)
40 g. heavy cream
1/32 tsp. (smidgen) salt
1/2 tsp. butter
1/8 tsp. (dash) Stevia powder
1/8 tsp. molasses 
1/2 tsp. vanilla
1 egg
1 egg yolk


Friday, July 9, 2021

I Love to See the Temple Pop-Up Card

 I love this card.  It lays flat to fit in an envelope.  It took a while to get it just right and using my Silhouette made it possible.  I can't believe I used to cut pop-up cards by hand!


Children Watching Through the Window For Santa Christmas Card

 Check out my newest Christmas card!  Most of the designs are from the Silhouette Design Store.  Except the nativity on the mantle and the fireplace.  I don't remember where those came from..


Tuesday, June 29, 2021

Winter Wonderland Christmas Village Ornament

                                             Winter Wonderland Christmas Village Ornament


This is actually cuter than the picture shows.... (sorry)

Here is another paper craft for you! 


The SVG file for this project can be purchased here


.


Saturday, December 19, 2020

Deer Snow Globe Card


                      The download for this Deer Snow Globe Card and base can be purchased here.


Wednesday, May 1, 2019

Paper Pumpkin - 3D

I've looked around a lot and this is my favorite paper pumpkin.

Download a wicked free papercraft halloween pumpkin template I found over at sasatoku.co.jp  You can download the free PDF by clicking here.  I thought I wouldn't find anything decent for Halloween, but this pumpkin is not garish at all!
With a lot of poking around, the template can be found here.  It took me FOREVER to find it and I didn't copy a link directly to the pattern.

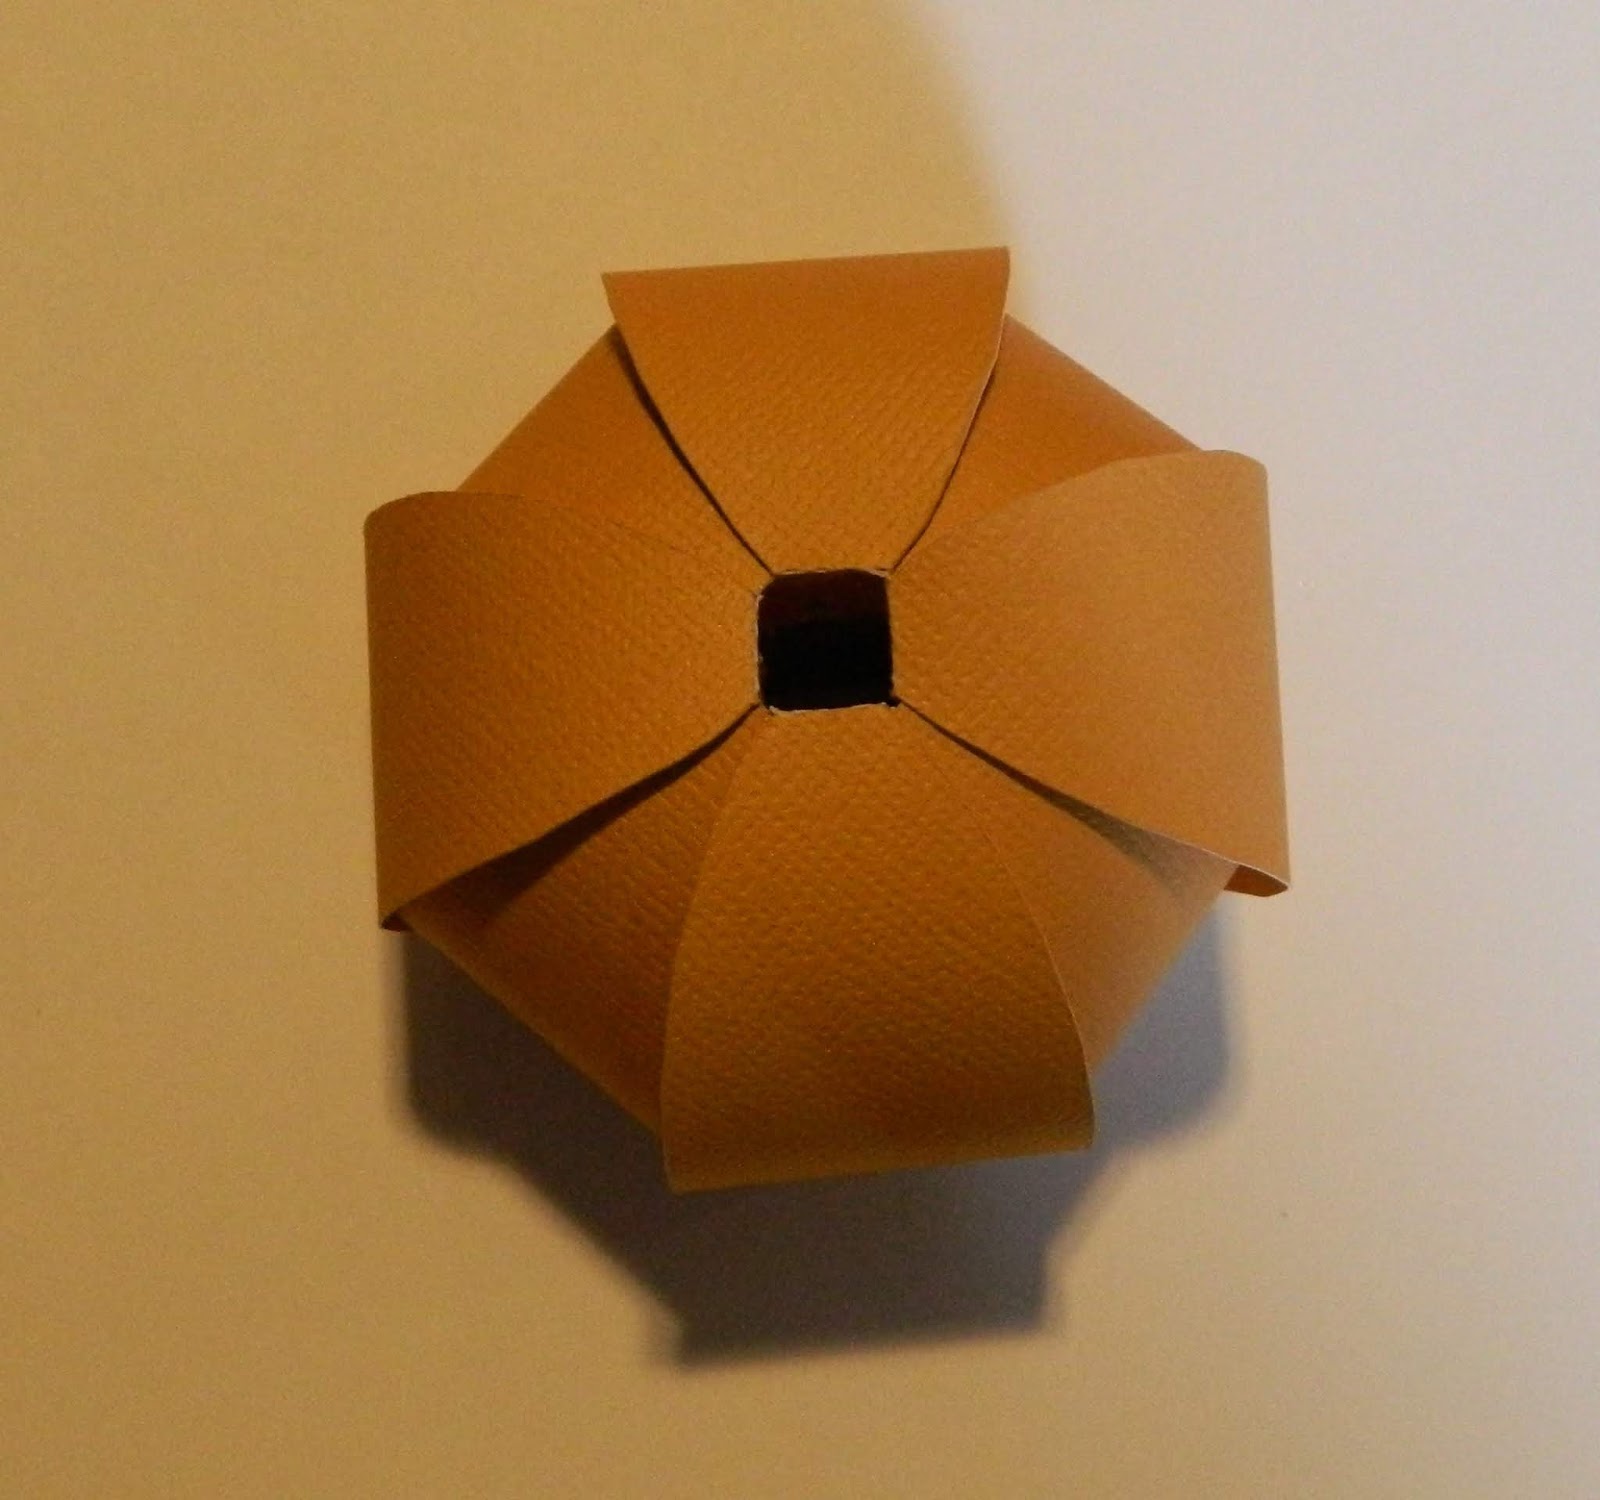
So, since it's free and I did my best to give credit where credit is due, I don't feel bad about posting the pattern here and making it easier for you.  I also added some pieces because I just couldn't get mine to look like theirs.  They must have taken a lot of time shaping theirs just right...  Mine isn't exact, but here is what it looks like:
I can't post the Silhouette cut file here for download but if you ask in the comment section, I will e-mail it to you.  (For free!)


Here's the instructions:

Here's the pieces all cut out.  (If you're using a Silhouette or other cutting machine, I used an 8" strip of orange paper on the right, and a 4" strip of paper on the left and cut both colors out at the same time.)


If you don't have a cutting machine, you can copy this pattern and size it to your preference and cut it out by hand.  (Uggh.  That's what cutting machines are for!) For the size I made in this tutorial the pumpkin piece will fit on an 8 1/2 x 11 piece of piece of paper.  (If you make it to fit a 12 x 12 piece of paper [or card-stock] then it's much easier to glue those flaps!)
side note:  the flourish on my leaf is from the Silhouette Design store so I can't give it to you.  The name of the file is: Pumpkin 3D Chunky Form by Snapdragon Snippets.  (I'm not entirely sure this link will work.)


fold and glue this piece together.


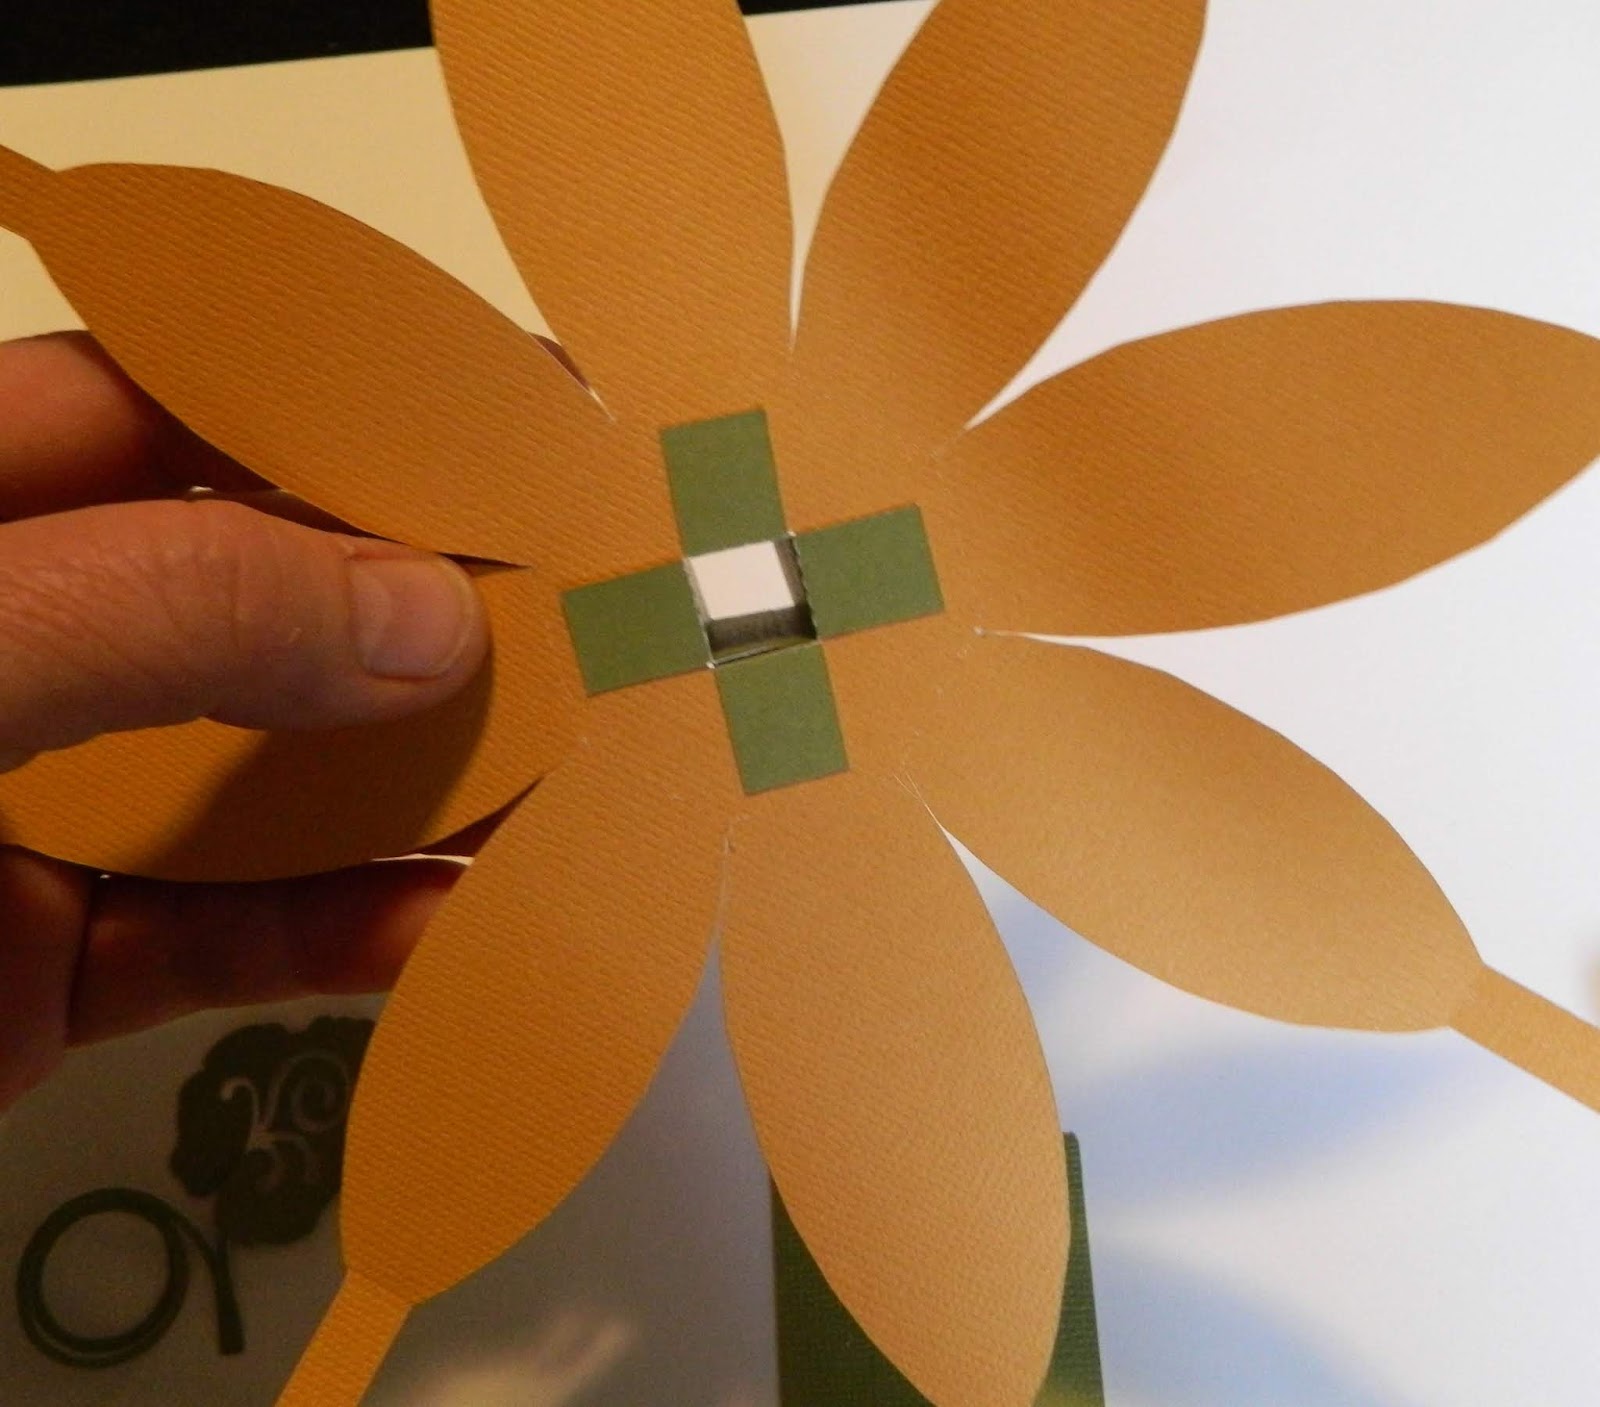
Insert it in the cut out square like shown and glue the tabs down.  This is the right or front side of the paper.


Turn it over.  This is the wrong side of the paper and the inside of the pumpkin.


The flaps on the diagonals all have a score line on the tab.  Fold the score line as shown and glue it inside the corner of the green center piece...


...like this.


Glue all four corner flaps.  You will need to hold the tabs while they dry.  This can be tricky and frustrating. sorry = (


Next, glue the remaining flaps.  Again, tricky and frustrating.  = (


All the flaps are glued in place (and staying there!)  = )


Wrap this piece around a pencil or something slightly smaller than the hole in the pumpkin...


...like this.  No need to glue it.  (By this point, you're probably sick of glue.)


Place this rolled paper down into the hole of the pumpkin. 


Twist the top to look like a stem. (or pinch and bend..)


Add the leaf and it's done!


This is my favorite paper pumpkin.  = )

Tuesday, March 26, 2019

Crochet Gnome Cone Hat

If you've ever wondered how to crochet a nice cone, like you'd want for a gnome hat, then here ya' go.. = )
Here is a the finished hat using these instructions...


Make a chain as long as you need for the size you want.  Join it into a circle using a slip stitch.


In the next chain, single crochet.


Continue single crocheting around.  This is worked in the round so keep going until you have 2 rows of single crochet completed.


Place a pin 5 stitches from the end of row 2.


Single crochet around again until you reach the pin.


Move the pin back 5 stitches and insert it.


In the next two stitches, do two single crochet's together - this is a stitch reduce.  You are making this row one stitch shorter than the last one.


Single crochet around until you reach the pin again.  Move the pin back 5 stitches, crochet 2 together in the next 2 stitches, reducing the row count by 1 again... crochet around until you reach the pin.... and on and on...


Here it is about 1/4 to 1/3 of the way done.  You can see the gradual sloping in..


When you get to this point, the pin comes out.  Put 3 single crochet's between the stitch reduce two (or so) times, then put 2 single crochet's between the stitch reduce, then one for a few times until the hole is closed up.  You just have to kinda eye-ball it at this point.  = )


The top is closed!


Chain 3. 


Cut the yarn (leave a tail several inches long), pull the tail through.  Then insert hook inside cone and pull the yarn inside.


Pull the tail tight until the point is as you want it.


All done!